
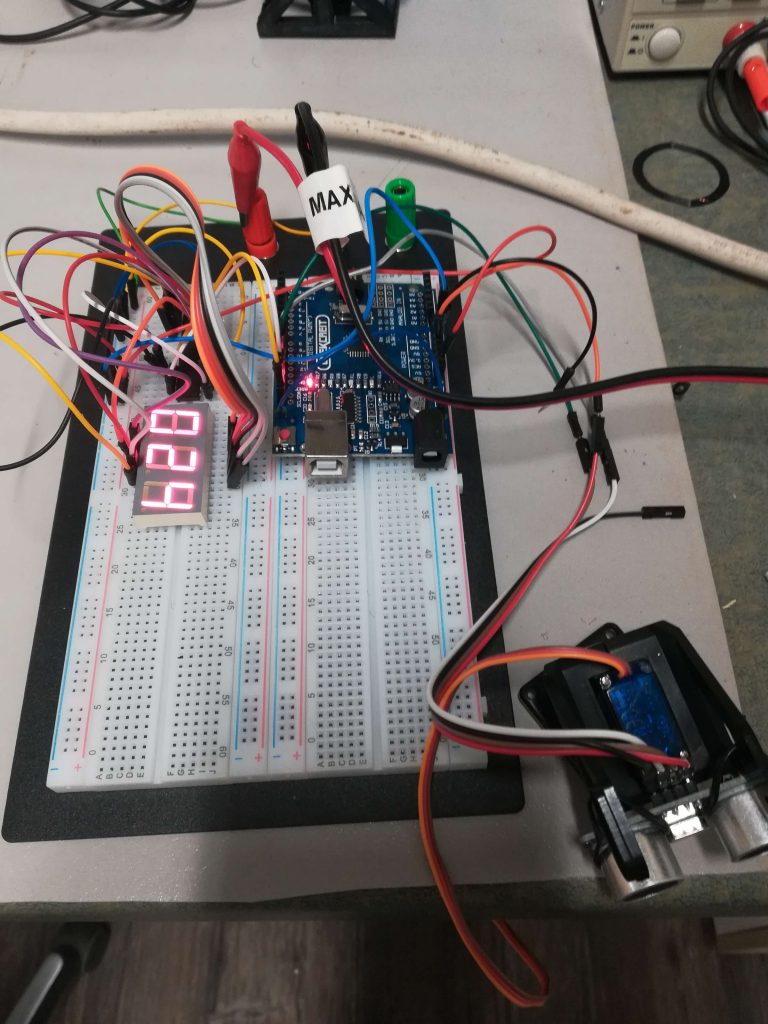
To detect objects at a distance in your Arduino projects, the HC-SR04 ultrasonic sensor is a common option. It comes as a board that’s easy to integrate in your projects, and it can be bought for pretty cheap. To learn more about this sensor I built a quick project on a breadboard to test it out. This prototype displays the current distance to the sensors on a 3 digits 7-segment display.
How does the sensor works? The sensor sends signals that bounce back when they reach an obstacle. It then reads the signal that bounced back to evaluate the distance. The module can “see” and measure an obstacle at any distance from 2 cm to 400 cm, but there is not much more in the datasheet.
Here is what I could see with that test:
- It’s pretty fast to get a measurement, a few milliseconds is all it needs. In the project, I’m only taking a measurement each 1,5 second so I have time to read it.
- The accuracy is very good (about +-1 cm) if the obstacle is a flat, hard surface right in front of the sensor. It will have a lot more trouble measuring something squishy like your hand, or something that’s not flat since the signals will bounce around unpredictably.
- It really does see straight ahead only: if the obstacle is not exactly in front it won’t see it. In a robot (such as the Geekcreit car kit I built), you can move the captor around to get samples at various positions, or have more than one sensor.
It’s not a LIDAR that would have a true 180-degree vision, but for the price there are interesting uses. I wouldn’t use this for precision work, but it’s a cheap way to see that an obstacle is there, and if it’s close.
Hardware
If you want to test it out yourself, you’ll need one of each, in addition to your breadboard and hook-up wires:
- Arduino Uno (or any other 5V Arduino with i2c support) (Banggood | Amazon).
- HC-SR04 ultrasonic sensor. (Banggood | Amazon)
- MCP23017 I/O expander. (Banggood | Amazon)
- Kingbright BC56-12SRWA 7-segment module (common cathode).
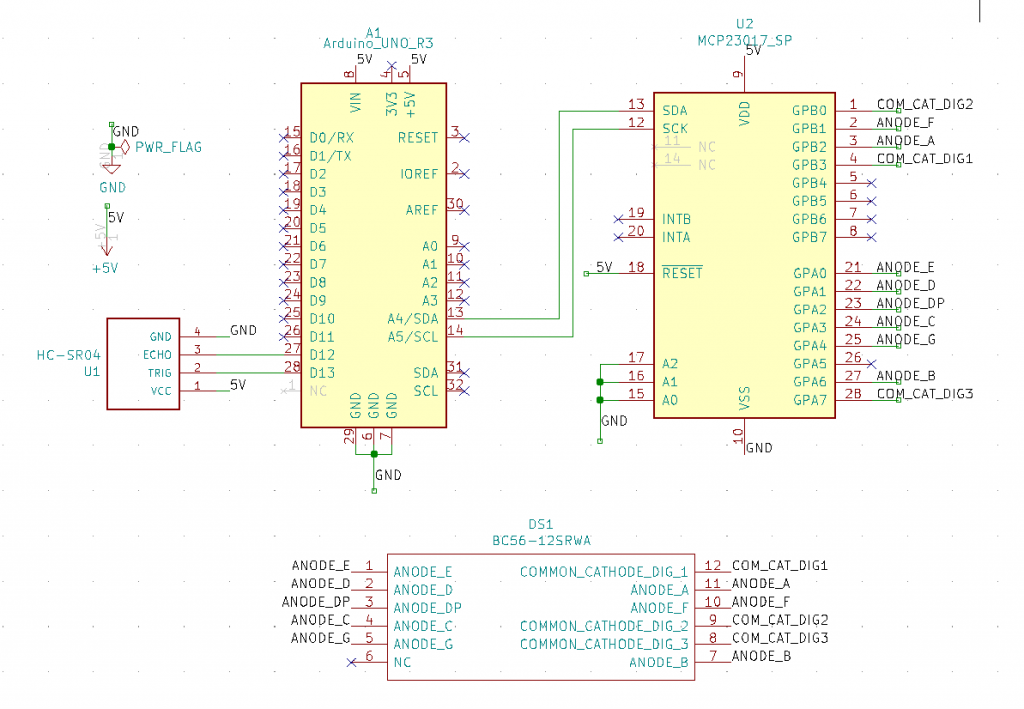
There are enough pins on the Arduino that you could control it directly, but I had a few MCP23017 on hand and wanted to test them out. Also, I didn’t want to use up all the Arduino pins to drive the 7-segments in case I wished to expand the project more in the future.
On another note, usually 7-segments with more than one digit are driven using multiplexing, displaying each digit in a quick succession faster than the eye can see. So, in that case, 11 pins are enough to drive 24 LEDs, including the dots. The display I had on hand was with a common cathode that had to be driven to the ground to light up the selected segments, for which the anodes to light up are driven to 5V. You need to be careful there since there are also 7-segments for which the anode is common instead.
Software
The software reads the distance every 1,5 seconds and displays the values on the display. It also sends the data over the serial port for debugging. If the sensor sends an invalid reading (-1), for example if something is straight in front, it will light up the dots instead.
There are 2 extra libraries used here to install from the library manager if you wish to use this code:
- HRSR04 by Martin Sosic to read from the ultrasonic sensor.
- Adafruit MCP23017 Arduino Library by Adafruit to send the output signals to the MCP23017 by I2C. In this project there is no need for input pins, but the library also supports it (including the interrupt pins).
#include <HCSR04.h>
#include <Arduino.h>
#include <Adafruit_MCP23017.h>

const int NUMBERS[] = {
	 0b111111001011, // 0
	 0b100111001000, // 1
	 0b110111010011, // 2
	 0b110111011010, // 3
	 0b101111011000, // 4
	 0b111110011010, // 5
	 0b101110011011, // 6
	 0b110111001000, // 7
	 0b111111011011, // 8
	 0b111111011000, // 9
         0b100110000100, // DP Only
};
// The pin for the digit must be to ground.
// Those output are at 1 in both NUMBERS and DIGITS.
// We will use XOR with both array so the pin for the digit to show will end up
// as a 0 for the common cathode.
const int DIGITS[] = {
   0b100000000000, // First
   0b000100000000, // Third
   0b000010000000, // Second
};

int const ULTRASONIC_TRIGGER_PIN = 13;
int const ULTRASONIC_ECHO_PIN = 12;
// Initialize the pins to use for the ultrasonic sensor
UltraSonicDistanceSensor distanceSensor(ULTRASONIC_TRIGGER_PIN, ULTRASONIC_ECHO_PIN);

Adafruit_MCP23017 IOExpander;

void setup() {
   // Starts the connection to the I/) expander with i2c
   IOExpander.begin();
   // Put all the pins in output mode, since all the pins used will drive
   // the leds.
   for (int i=0; i < 16; i++) {
      IOExpander.pinMode(i, OUTPUT);
      }
   // Initialize serial connection to print values from sensor.
   Serial.begin(9600);
}

void loop () {
   // Do a measurement using the sensor and print the distance in
   // centimeters.
   int distance = (int)distanceSensor.measureDistanceCm();
   Serial.println("Distance");
   Serial.println(distance);
   char distanceArr[4];
   sprintf(distanceArr, "%03i", distance);
   for (int j=0; j< 100; j++) {
       // If distance greater than 0 print the number, otherwise light up
       // the dots.
      if (distance > 0) {
         // Printing each digit in quick succession to display them all
         // (multiplexing).
         for (int i=2; i >= 0; i--) {
            int numberIndex = distanceArr[i] - 48;
            int number = NUMBERS[numberIndex];
            IOExpander.writeGPIOAB(number ^ DIGITS[i]);
            delay(5);
         }
      } else {
         for (int i=2; i >= 0; i--) {
            IOExpander.writeGPIOAB(NUMBERS[10] ^ DIGITS[i]);
            delay(5);
         }
      }
   }
}
In conclusion, if you want to use the sensor in your projects and need some precision, I recommend you build a test project such as this one to make sure it’s precise enough for your needs; depending on the shape of the obstacle, it may be hard to get a precise reading. Still, for the cost, it’s certainly an option worth exploring.